Most of the times, we regret the mistakes we did in past. We even wish for a chance to go back with time and wipe out the awful incident that has happened. And it’s like wishing for a cold day in hell.

But in Windows, you can do it! Yes, you heard me right. Suppose, you have made some changes in your computer (not on personal data) and now, you no longer need them. At this point of time, you need to undo the changes that you have done on the system without affecting your personal files. So, how you are going to do it? Here comes the picture of System Restore.
System Restore helps you to restore the computer to an earlier point in time. It’s a way to undo system changes to your computer without affecting your personal files, such as e‑mails, documents, or photos.
In this article, I am going to show you how to create System Restore point in Windows computer (on latest OS- Windows 10).
Step 1: Go to Start, type Recovery and hit Enter
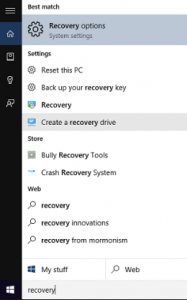
Step 2: Select Configure System Restore
![]()
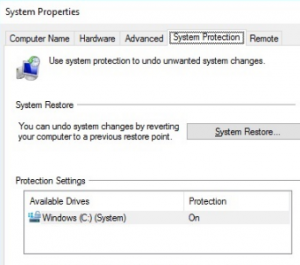
Step 3: Provide credentials in System Protection window
Step 4: Go to System Protection and check Windows drive (C) Protection is turned ON
Step 5: Select the drive where Windows is installed and hit Create button
![]()
Step 6: Give description for the restore point and hit Create button

Step 7: Close the window one you see the message “The restore point was created successfully.”

You can use these restore points to traverse back in time when you face any issues in the system due to modifications done. So, how to restore the system to the previous point? Here you go…
Step 1: Opt Open System Restore in Recovery window
Step 2: Provide password and go next
Step 3: Select most recent restore point and proceed
Step 4: Hit Finish button
In case, if you face any difficulty in restoring your system to a specific point or system restore process failed then here is a simple trick to complete system restore in Windows 10.