- Recover Data
- Recover Hard Drive
- Secure data recovery from hard drive, external HDD, SSD or any other storage media
- Recover Partition
- Recovery of data from Deleted/Lost, Formatted, Damaged or RAW partitions and volumes
- Recover SD Card
- Retrieve files from camera memory card, USB, flash drive and all other storage devices
- Recover Deleted Files
- Undelete any files, folders and documents that are lost, accidentally erased, emptied from Recycle Bin or Trash using Remo Recover tool
- Recover Photos
- Expert in recovering deleted or lost pictures, RAW images and other media files
- Recover Videos
- Safely restore video and movie files of any format to its original condition, that are lost or deleted from your camera, SD card or hard drive
- Recover Hard Drive
- Repair Files
- Repair Outlook
- Securely fix Outlook data file (PST); recover deleted emails, attributes and other items
- OST to PST Converter
- Convert corrupt or orphaned OST into a working Outlook PST file, along with all of its content
- Repair Word
- Repair corrupt Word .doc and .docx files to regain all its content and formatting
- Repair PowerPoint
- Fix Microsoft PowerPoint files (PPT, PPS and PPTX) that are not working or are damaged
- Video File Repair
- Fix corrupt or unplayable MOV, AVI, MP4, or other video file on Windows and Mac
- Repair PSD
- To fix corrupt or damaged Adobe Photoshop PSD & PDD files while retaining all its layers
- Repair Zip File
- Repair broken Zip and ZipX and extract all its files and folders intact
- Repair RAR File
- Fix RAR archive errors and damage to extract all of its contents safely
- Repair Outlook
- Download
- Store
- Contact Us
- English
HCL Laptop Recovery
A data recovery tool designed to perform HCL laptop data recovery under all circumstances. Remo Recover also works for recovering files from all types of storage devices
Recovering HCL Laptop Files and Folders
Remo Recover is a complete data recovery utility for all Windows based operating systems, let be a Desktop, a Laptop or a Notebook. This software is for those who wish to recover files and folders which are deleted or lost due to any unfortunate reasons – technical or unintentional. This application becomes so vital in such situations that it is recommended to have it as a standby in case any data loss scenario is encountered. Many professional as well as home users across the globe make use of this amazing data recovery package to carry out data restoration and other optimization tasks on their computers and laptops.
Performing HCL Laptop recovery using Remo Recover utility:
Remo Recover software becomes handy as performing HCL Laptop recovery can be carried out anytime and at any place – at office or at home without any technical knowledge or help. This Windows recovery tool is an essential and one of the most reliable tools to perform HCL Laptop recovery, thanks to its extremely powerful and smart scan & fix engine combined with a smooth and hassle-free graphical user interface. This software, once registered can be used on any Windows system to recover HCL laptop data any number of times and for any duration without any interruptions. There’s no need to re-register or validate this software time and again. For beginners, there’s a free demo version of Remo Recover available with a complete list of features that are found on the registered version of this product. You can make use of the demo version of this tool in order to scan, fix and retrieve HCL laptop data and as well preview all recoverable contents before going for the registered version of this tool. Once you are apparent of the capabilities of this software and you’ve registered it, this software is all yours – you can use it for as long as you want and as many number of times to restore HCL laptop deleted or missing files and folders.
Just download and install the demo version of this software, or you can directly go for the full version of Remo Recover by clicking on the download button. Follow the simplistic step by step guide along with its respective screen-shots in order to perform complete data or a particular file recovery on HCL Laptop or on any Windows based computer with ease. There are many outstanding features of Remo Recover that helps in restoring HCL laptop data easily. The most important ones are briefed below:
- Remo Recover software can scan and detect more than 300 different types of file formats; this means almost all data of any kind which was deleted from your system can be recovered using this tool
- Supports recovering of files and folders from almost all kinds of delete actions on a Windows system. No matter if the data is deleted due to accidental file deletion, virus infection or due to any technical issues such as file system corruptions, Remo Recover is always there to rescue
- Recover files and folders which are deleted after formatting, re-formatting, partitioning, re-partitioning errors
- Remo Recover software is so powerful that it can even repair Bad sectors on a drive if there’s a need to extract deleted or inaccessible files from that storage drive
- Can perform data recovery directly on all Windows supported devices such as external hard disk drives, memory cards, pen drives, cameras, phones, etc. through a Windows computer or a laptop
Steps to recover data from a HCL Laptop using Remo Recover:
1. Download and install Remo Recover on your HCL laptop.
2. From the main screen select the drive from where you want to recover data. You can click on the Can’t find the drive option if your drive is not recognised on the main screen.
3. Click on the Scan option to initiate the scanning process.

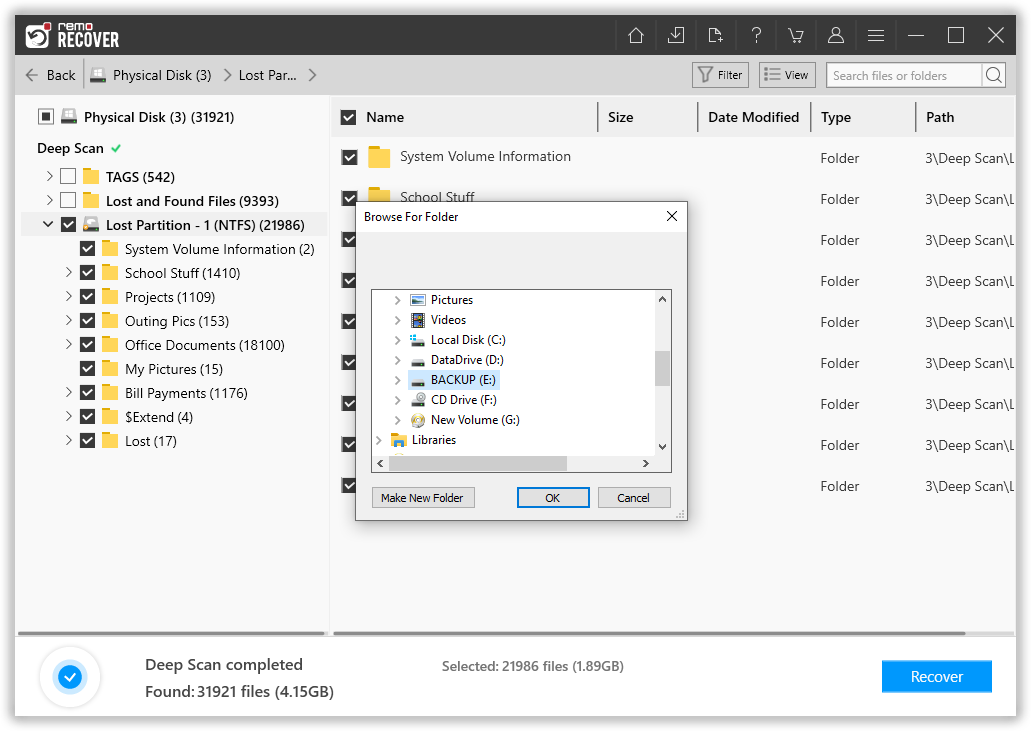
Note: Once the Quick Scan is completed it directly starts Deep Scan without any human intervention, click on the Dynamic Recovery View. Go to the Lost and Found Files folder in the Tree structure and find your files.

4. Finally, select the files which you want to restore and click on the Recover option.